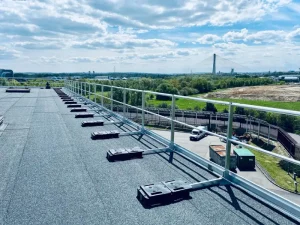
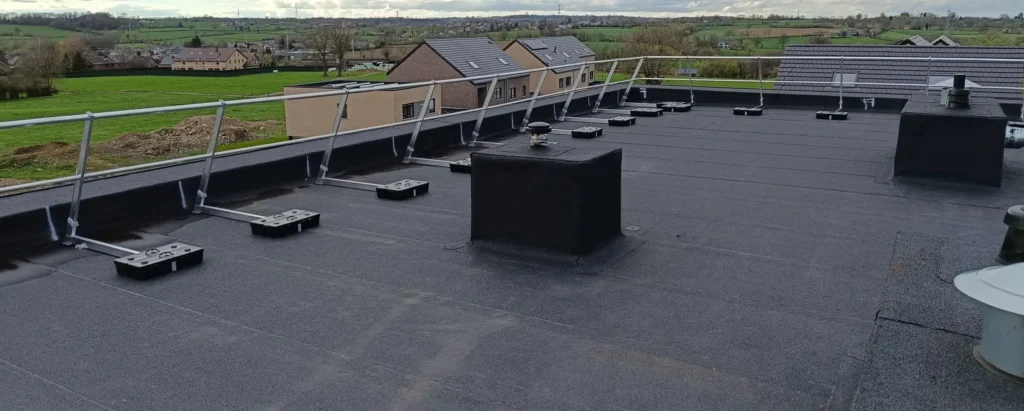

Freestanding edge protection railings are an easy and quick solution for securing roofs against falls from height. The biggest advantage of this type of railings is avoiding any intervention of drilling the waterproofing roof (counterweights). Additionally, the small amount of components in a modular system makes installation simple and quick. In the following guide, we will discuss all the steps necessary to properly install these kind of railings. Please note that all installations involving free-standing edge protection railings should comply with EN ISO 14122-3 European Standard – permanent means of access. This is the correct standard to apply for this type of railings.
Tools needed for installing freestanding edge protection railings and what to pay attention for
To properly install freestanding edge protection railings, we only need a few basic tools and accessories. These include:
- Allen key
- Screwdriver
- Rubber hammer
- Measuring tape
- Spirit level
To install freestanding railings in a flat roof, there should be a stop or parapet with a height of at least 20 mm at the edge. This prevents the risk of the railings slipping (frost under the counterweights). If there is no such parapet at the roof edge, please contact us and we will work on the best solution for securing your roof. Please also note that when the parapet height is less than 100 mm, the European standard EN ISO 14122-3 requires the installation of a toe board. The toe board is a horizontal profile located at the base of the guardrail. It prevents people from slipping under the guardrail.
At least two persons are required to install freestanding edge protection railings. As the assembly work takes place at height, operators performing the installation should be properly secured to avoid the risk of falling from height.
Installation of freestanding edge protection railings step-by-step
An uprights distribution plan provided by the railings manufacturer or their authorised distributor for a given project ensures that your installation complies with the EN ISO 14122-3 standard. In the absence of this plan, you should ensure during the railings installation that the distance between uprights does not exceed manufacturer specification written on the technical documentation or declaration of conformity with the above standard. The normal distance between uprights certified according to EN ISO 14122-3 standard is up to 1500 mm.
1. Lifting railings onto the roof
Lifting railing components of the free-standing modular system is a delicate operation. Ensure that the packaging has not been damaged during transport. In the case of counterweights pallets, we recommend not to place them directly on the roof, as they are very heavy (over 1 tonne each pallet). It is best to keep the pallet in the air and distribute the counterweights at the particular places where we will install the uprights later.
2. Mark the place where you will place the railing uprights
Based on the uprights distribution plan, locate both uprights and self-supporting bases in the correct place. If there is no uprights distribution plan, remember that the maximum distance between uprights is usually 1500 mm (check the manufacturer’s certificate of conformity with EN ISO 14122-3 standard). Once located the self-supporting base in the right place, screw the counterweights to it. We always recommend starting the installation of modular roof railings from the corner.
GREEN ROOF – GRAVEL: When installing freestanding edge protection railings on a green roof, you should first remove the existing layer of gravel at the self-supporting bases location. We must ensure that both the railings self-supporting bases and counterweights rest directly on a stable and flatness surface. Considering that regulations require us to ensure 1100 mm height from the roof circulation surface to the railing handrail, the thickness of the gravel layer must be taken into account when selecting the proper upright to install.
3. Screw the uprights and other freestanding edge protection railings components
Insert the uprights into the self-supporting bases followed by a knee-rail. Repeat this step for the entire roof edge section you want to secure. Then connect the knee-rails and screw them. Next, screw the knee-rails to the uprights. Place the handrails on the uprights and connect all them as we did with knee-rails. Clip then the plastic plug onto the upright once the system has been adjusted using a rubber hammer. Repeat this step for each section to secure.
4. Connecting individual railing sections
Connect the handrails and knee-rails of different sections by means of corner angles (if necessary). Using a spirit level, verify that all uprights are vertical and the handrail is horizontal and at a height of 1100 mm in relation to the roof circulation level (required by EN ISO 14122-3 Standard). Then block the uprights to the self-supporting bases. Finally, clip the plastic plugs at the ends of every section. Always preferable to use for that wall connectors.
NOTE: Aluminium is a soft material easy to cut. If necessary, aluminium handrails and knee-rails can be cut on site to fit the required lengths. Just make sure that there are no sharp edges left after cutting. Both handrails and knee-rails are supplied in lengths of 3 metres.
SUMMARY
The installation of freestanding edge protection railings is quick and easy. It does not require any specialist knowledge or tools. It is important to keep the distance between uprights specified in the manufacturer’s certificates of conformity so that the installation complies with the EN ISO 14122-3 European Standard.
Thanks to our wide range of roof railings, we can offer our customers the best edge protection option depending on the specific needs of their roof. If you are looking for a different type of roof railing than the one shown above, we encourage you to read our guide on securing your roof with safety railings.